background

Sunday, November 24, 2013

Christmas Cards.... 2013

While I wait for some cookie dough to defrost, I will post a couple of pictures of some Christmas cards I have managed to make!  Its been busy but I have quite a few cards made. 

 I just love this little Elf from sliekjestmaps.com

Copics:
Hat and clothes: R22, R29, R56, R59, YG03, YG06, YG09
Bag: E15, E13, E11
Shoes: E11, E00
Skin: E11, E00, E000, R22
Hair: C5, C3, C0
Gifts: variety of RV, BG, and Bear: I used some of the Yellows

 Love this girl!! Image courtesy of Cuddlebug Cuties!

Copics:
Hair: C7, C5, C3, C0
Skin: E13, E11, E00, E50, R20
Lips: R22, R20
Eyes: W3, W0
Sweater: R20, R22, R24
Pants & Scarf: B12, B14, B16
Boots & Mittens: E15, E13, E11

 For this cards above and below I used distress ink from Tim Holtz to create the backgrounds.  Then I also used distress ink on the trees to give them a more aged look.  I cut out the snow lopes by hand.  I am pretty happy with them.  Love the Tim Holtz distress inks. 
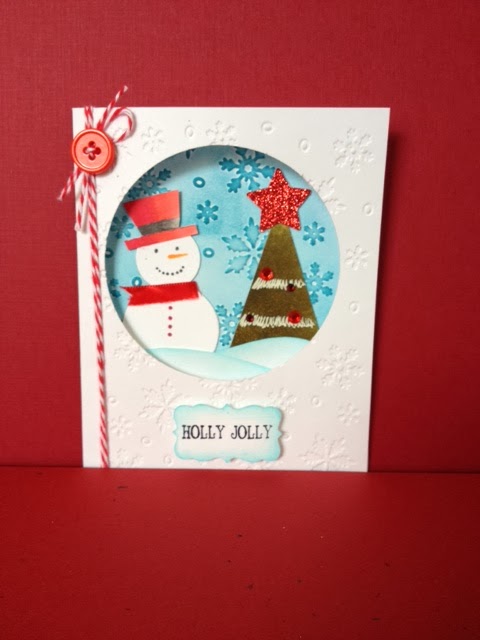
 On this card below I wanted to create a window card.  I cut the window but a Spellbinders circle die.  I also cut another circle die for the inside background which I embossed with snowflake embossing folder by Darice and then also use Spellbinder circles to cut out the snowman shape.  I colored the snowman's hat (hand drawn and cut) with Copics R29, R22, R20) and also drew the eyes and buttons with copics.  I used a red ribbon for his scarf.  The tree I used Tim Holtz Distress Ink Moss Green and added embellishments. 
I made some hand cut and colored snow slopes with VersaMagic Sea Breeze Chalk ink.


Thursday, October 31, 2013

Christmas is just around the corner... I've been working on some cards so I haven't had much time to post but here is a sneak peak at a couple of cards I've made.

Mimi in Paris stamp set.  I colored Mimi with Christmas colors on her clothing and stamped a Christmas gift box from another stamp set on her hand.  I like the end result. 

Copic Markers Used:
Hat and stripes on dress: G17, G15, G12, R27, R24, R22
Shoes and Hair: W7, W5, W3, W1
Gift: BG18, BG15, BG13
Skin: E11, E00, E000, E50
 

Pure Innocence Stamp from MFT. 

Skin: E11, E00, E000, E50
Outfit: YG17, YG15, YG13
Hat: Same YG and R17, R14, R12
Boots: W3, W5
Snow: B000 and 0


Thursday, October 3, 2013

Surprise design...

Well, I am working on this little girl and will be finishing the card soon! What will it be?  Stay tuned..

Image is Gorjuss stamp freebie from scrapdelizblogspot.com. I wanted to try my Warm Grey copics.  I need to get some of the darker ones but liked the way she turned out!  I thought, why in the world do I need Warm Greys?  If I want to color something gray, I just get the Neutral Greys.  But then I realized that the Warm Grays are for colors of hair that are more like an Ash Brown.  So there, that answers my question of why do I need Warm Greys!!

I used the wonderful Dienamic Ovals to cut out the oval shape!  And of course, Copic markers R24, R22, and R20.  I get them at Hobby Lobby or Michael's.

The finished card will be coming up soon!! 


Wednesday, October 2, 2013

Fall, Fall, Fall!

This is one of my favorite seasons of the year and I couldn't wait to make a card!

Here it is:

Its Fall and I am Thankful!


 Image: My Favorite Things: Make A Splash
Pumpkins: Studio Stamps
Die Cut: Dienamics from My Favortie Things

Copics:
Skin:  E11, E00, E000
Hair:  E15, E13, E11
Dress:  V09, V06, V04, V01, V000
Pumpkins: YR07, YR04, YR02
Sandals: W01, W03
 Background: Sponged Sea Breeze Chalk Ink VersaMagic

I loved coloring this image and was not sure if the pumpkins would look good with it! But I think they do and loved the way they came out.  I masked the image so that I could stamp the pumpkins over it and give it a behind look like it shows on the card.  Cardstock, ribbon, stamp, tag die cut and button and designer paper is from Michael's and JoAnnes.


Stampin' Up Idea Card


I loved making this card! Can you tell? :) Its very cheerful and I got all the ideas from a company I am getting very fond of: Stampin' Up! None of the supplies used from them but I would to get some in the near future! I love the ideas of stamping the flowers the way you see them shown on this card.

How I did it?:

I used clear stamps of flowers, leaves and butterfly and stamped them randomly on the card.  Then I stamped another flower and a butterfly and placed them over the already stamped image I had done originally to give it a 3-D effect.  I used dimensionals to raise them up and glued them to the cardstock. Absolutely love it!! I don't have the puncher to cut them out, so I had to that manually.  That's what I may be buying next!  

The picture below is sideways to show the 3-D effect of the flower and top and middle butterfly!  I really love it!!

Supplies are again from Michael's, JoAnne's and the Oval is from My Favorite Things Dienamics.

Wednesday, September 18, 2013

Practice Makes Perfect!

Well, I am not there yet, but I have been practicing coloring on different hair styles.  I am very happy with this one!  I've been practicing the flickering or feathering techniques on hair and I think I am getting it.  I will post more hair styles as I practice.


I cropped this image that was so nicely provided as a freebie by Ann Stillwell from Cuddlebug Cuties.  I love her images and are so good for coloring!

I hand wrote on the image the Copic colors I used.  I should have written them nicer, sorry, but I was excited about how well the blending and technique came out. 

I hope you enjoy it!

Thursday, September 12, 2013

And yet... another September birthday!! 

Happy Birthday, brother in law!!  This card is coming to you soon...


Masculine cards are hard to make I guess.  I can't use a ribbon and a button may not seem right.  I guess it depends on the theme.  I again used the sponging technique using Chalk Ink from Versa Magic: Niagara Mist.  The image is a Freebie Vintage car courtesy of: 4blogspot.com.

I used Spellbinders die cutting rectangles and also rounds and scallops.  Black ribbon and clear color beads.

I hope you like it!

Wednesday, September 11, 2013

Baby Boy on his way!!

I made this card for my cousin's wife!  She is having a baby shower soon and what better than a handmade card! I had fun make it.  I had bought these cute little baby shower stamps and wasn't quite sure how to use them.  But, thanks for Google!!  I search for ideas and this is what I came up with.


Copics Used:

Lamb: C1, E50, R22, R20, R11
Start: Y15

That's it!! Not much to color here!! Oh, I added a soft cloudy blue touch around the edges of the circle.  I sponged a little bit of chalk ink from Versa Magic, Sea Breeze color.  I love using this technique on cards. Other supplies are from craft stores and using Spellbinder dies to cut the round and tag shapes.  I hope you like it!

Moondrea Progressive Challenge

Moondrea Progressive Challenge  Hello!  Wow, trying to get back to crafting after many years.  Here is my entry for the Moondrea Progressi...