Coloring Tutorials on my
YouTube Channel!
So excited about my Youtube channel. I will uploading more videos soon! So stay tuned. Don't forget to "like" my videos and subscribe!
Basic Copic Coloring
Pure Innocence Image from
My Farovite Things
Copic Coloring Hair
Copic Coloring - Shirt
Copic Coloring - Pants
Basic Copic Color Blending
Re-sizing Digital Images
I hope that this simple tutorial helps you on resizing your images.
Distress Inks
YouTube Channel!
So excited about my Youtube channel. I will uploading more videos soon! So stay tuned. Don't forget to "like" my videos and subscribe!
Basic Copic Coloring
Pure Innocence Image from
My Farovite Things
Penny Black
More Copic blending
Copic Coloring Hair
Copic Coloring - Shirt
Copic Coloring - Pants
Basic Copic Color Blending
Copic Coloring Genie Hair
Re-sizing Digital Images
I've seen this question asked a lot so I wanted to make a very simple tutorial on an idea I got from another crafter I saw in YouTube where she used this technique.
It is a very simple technique but it works GREAT for me!!
First I open Word and set it on the Print Out Layout View (See my little Teddy under the screen? He keeps me company)
Next, I open the image I want to resize and place the die over the computer screen. I select the image and then grab the image by the corner and shrink it or enlarge it to fit inside the die.
Then I print out the image and this is what it looks like compared to what it did when I had the die up against it on the screen. Pretty close, right? You can do this with any shape and size die.
I hope that this simple tutorial helps you on resizing your images.
Distress Inks
Backgrounds
Distress ink are fantastic for blending and therefore creating stunning backgrounds. I love the look you get and all the endless options there are when you blend them. Here's an example of how to make very simple snow slopes using Distress inks.
I chose the following colors: Tumbled Glass, Faded Jeans, Dusty Concord and Black Soot
 |
| Select Colors |
 |
| Cut Slopes on Sticky pad |
 |
| Choose die of choice and cut paper. Keep it attach and secure with tape |
 |
| Place sticky on circle as shown. |
 |
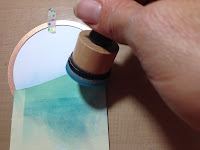
| Select first color, Tumbled Glass and sponge as shown below |
 |
| Press downward gently to create a crisp blue line |
 |
| Finish coloring the entire circle |
 |
| Continue with Faded Jeans. Color until you reach the slope but not exactly over all the first color |
Continue the same steps for all the other colors. Do not color all the way to bottom. Color only half way on the uncovered area. In other words, you want it darker on top and lighter on the bottom, close to the "horizon."
When done, peel carefully and it will unveil your beautiful coloring. This is a night sky. I added later starts with a white gel pen. You can choose any other method of your choice. Be careful. The ink will still be wet. Let it dry completely before you handle it. I hope it works for you!


Awww! I love it! Thank you very much, María. :)
ReplyDeleteThank you, Alicia! :)
DeleteGreat tutorial! So well explained. Now I just hope not to make a mess it on top of my already coloured digi :s Thank you very much
ReplyDeleteI love it! Thanks!
ReplyDeleteThank you Aurora and Beatriz!!! :) I will be making more!
Delete